
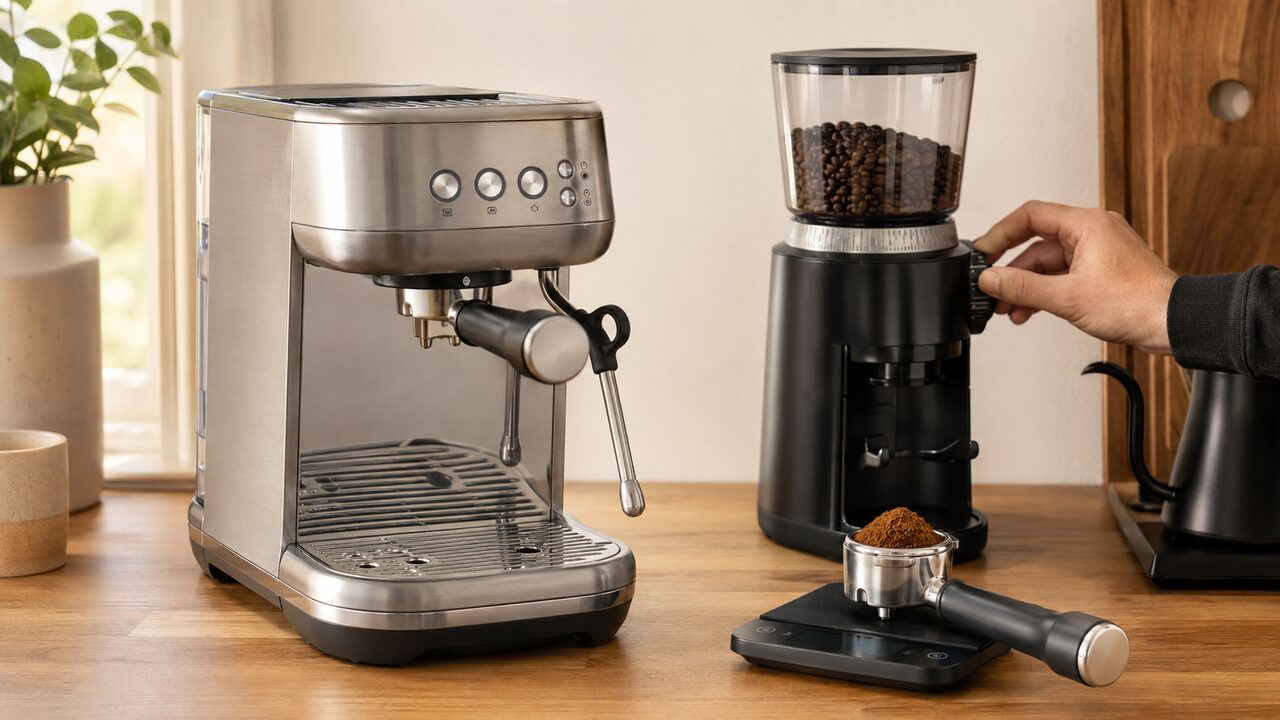
For a reliable Bambino Plus starting point, use the 2 CUP single-wall basket, 18 g of freshly ground coffee, a fine espresso grind and a level, consistent tamp. The first espresso should appear after roughly 8–12 seconds. Adjust the grind before changing several other variables at once.
The BES500 has preset shot volumes, manual pre-infusion and programmable volumes, but it does not have a built-in grinder or an adjustable brew-temperature control. If the machine is new, complete the Bambino Plus first-use setup before dialing in coffee. Good settings then begin with the correct basket and an espresso-capable external grinder, and finish with a measured dose and stop point.
Quick Bambino Plus starting settings
| Variable | Recommended starting point | What to adjust |
|---|---|---|
| Basket | 2 CUP single-wall for freshly ground beans | Use dual-wall for pre-ground or older coffee |
| Dose | 18 g in the 2 CUP basket | Stay within the documented 16–19 g range |
| Grind | Fine espresso grind, not powdery | Finer for faster flow; coarser for slow drips |
| Tamp | Level and consistent | Do not use tamp force as the main flow control |
| First flow | About 8–12 seconds after pressing the button | Earlier suggests low resistance; later suggests excess resistance |
| Yield | About 36 g from an 18 g dose as a practical first recipe | Change the stop point to suit the coffee and taste |
| Shot control | Use manual mode while dialing in | Program the button only after the recipe is repeatable |
The 36 g yield is a useful espresso starting ratio, not a Breville factory volume. Coffee weight is more repeatable than the height or apparent volume in a cup because crema occupies space and changes as it settles.
Start with the right filter basket
The U.S. BES500 package includes 1 CUP and 2 CUP baskets in both single-wall and dual-wall formats. These baskets are not interchangeable settings for the same coffee. Choose one format before changing the grinder.
Single-wall baskets for fresh whole beans
Use a single-wall basket when grinding fresh whole beans. It lets grind size, dose, distribution and tamp determine the resistance. This produces the most control, but it also exposes inconsistency in the grinder or puck preparation.
- 1 CUP single-wall: the manual specifies 8–11 g.
- 2 CUP single-wall: the manual specifies 16–19 g; 18 g is a sensible first setting.
The 2 CUP basket is generally easier to dial in because its shape and larger dose tend to be more forgiving. It can still make one double espresso for a single drink; “2 CUP” identifies the basket and programmed button, not an obligation to split the shot between two cups.
Dual-wall baskets for pre-ground coffee
Use a dual-wall basket when the coffee is pre-ground, when its age is uncertain or when the grinder cannot make small, repeatable espresso adjustments. The basket creates additional resistance through its restricted outlet, so it is less sensitive to grind changes.
Do not copy a single-wall recipe into a dual-wall basket and expect the same flow. Also check the underside before every new dial-in session: confusing the two basket types can make a previously sensible grind look completely wrong.
A repeatable 18 g starting recipe
- Fill and firmly seat the water tank, then let all three main buttons reach their ready state.
- Install the clean, dry 2 CUP single-wall basket.
- Run a short blank flow through the group head to warm the path, then dry the basket again before adding coffee.
- Grind 18 g of fresh coffee at a fine espresso setting.
- Distribute the grounds evenly, tamp level and wipe loose coffee from the basket rim.
- Lock in the portafilter, place a preheated cup and scale beneath it, and tare the scale.
- Use manual extraction and stop near 36 g in the cup for the first test.
- Record the grind setting, dose, first-flow time, final yield and taste before changing one variable.
The Bambino Plus reaches its internal ready state quickly, but a cold portafilter and cup can still remove heat from the drink. A short blank flow and a preheated cup improve consistency without pretending that the machine has a hidden brew-temperature setting.
There is no universal Bambino Plus grind number
The Bambino Plus does not control grind size. Numbers belong to the separate grinder, and the same number can produce a different particle size on another model, another unit or even the same grinder after burr calibration. Bean density, roast level and age also change the required setting.
Begin in the espresso range recommended by your grinder manufacturer. If the shot runs too quickly, move finer in a small step. If it barely drips or the machine stalls against the puck, move coarser. Purge a small amount after a grind adjustment so retained grounds from the previous setting do not distort the next test.
A grinder with small, repeatable espresso adjustments makes this process much easier. The Baratza Encore ESP is a standalone espresso-focused grinder, so it does not depend on a proprietary connection to the BES500.
Adjust grind, dose and tamp in the right order
Use grind size as the main flow adjustment
Once the basket and dose are fixed, grind is the cleanest way to change flow. Move finer to create more resistance and slow the shot. Move coarser to reduce resistance and speed it up. Make one small change, prepare the puck the same way and test again.
Keep dose within the basket range
Dose is useful for fine corrections or for matching a particular coffee, but large changes also alter headspace and puck behavior. Start at 18 g in the 2 CUP basket. If the tamped puck sits too high, the portafilter is difficult to lock or coffee marks appear deeply on the puck before brewing, reduce the dose rather than forcing the handle.
If 18 g leaves excessive headspace with a very dense coffee, a small increase can be tested without exceeding the basket’s 19 g documented maximum. Use the supplied Razor tool after tamping if you need a physical check of the intended puck level.
Tamp for consistency, not as a rescue setting
Breville documents approximately 22–33 lb (10–15 kg) of tamp force, but also states that consistency matters more than the precise force. A level tamp prevents one side of the puck from offering an easier path. Pressing dramatically harder is not a reliable substitute for a finer grind, and a very light tamp is not a good substitute for grinding coarser.
How to read the extraction
| What you see | Likely setting issue | First change |
|---|---|---|
| Flow begins in fewer than about 7 seconds and looks pale or watery | Grind too coarse or dose too low | Keep dose fixed and grind slightly finer |
| Flow begins around 8–12 seconds and forms a steady narrow stream | Useful starting extraction | Taste before changing anything |
| First drops appear after 12 seconds, then the shot only drips | Grind too fine or dose too high | Keep dose fixed and grind slightly coarser |
| Empty group head flows normally, but a prepared puck stops the shot | Excess puck or basket resistance | Test a clean empty basket, then coarsen or reduce dose |
| Empty group head also has no or weak water | Not a normal dial-in problem | Use the water-flow diagnostic guide |
If the empty group head, hot-water outlet or clean empty basket also lacks flow, stop changing coffee settings. Follow the Bambino Plus no-water troubleshooting sequence to separate the tank, machine and maintenance paths safely.
Use taste after the shot reaches a sensible flow range
Timing and appearance are diagnostic clues, not the final goal. Once the shot flows sensibly, taste it. A sharp, thin or sour result may benefit from a slightly finer grind or a little more beverage yield. A harsh, dry or strongly bitter result may benefit from a slightly coarser grind or a shorter yield. Change only one of those choices for the next shot.
Crema alone is not a quality meter. Roast style, bean age and basket type can change its color and depth. A dual-wall basket can produce foam-like crema even when the underlying coffee is not fresh, while some fresh lighter roasts naturally show less crema than dark blends.
Use weight instead of relying only on cup volume
The factory 1 CUP and 2 CUP buttons target approximately 1 fl oz (30 ml) and 2 fl oz (60 ml). Those are convenient volumetric stops, but milliliters and grams are not interchangeable once crema is included. The apparent level in the cup can change even when the amount of liquid coffee is similar.
While dialing in, place the cup on a scale and use manual control. An 18 g dose with about 36 g in the cup is a practical baseline. Stop earlier for a more concentrated result or later for a less concentrated result, then judge balance rather than treating 36 g as a rule for every bean.
For compact scales, 53.3 mm tampers and other compatible 54 mm upgrades, see the complete Bambino Plus accessories guide.
Once you find a recipe you like, repeat it manually several times. Only then save a custom button volume. Programming an unstable shot too early hides whether changes came from the button, puck preparation or the coffee itself.
Preset, manual and programmed shot volume
Use the factory preset buttons for convenience
Press 1 CUP or 2 CUP once to run its saved volumetric extraction. The selected button flashes and the machine stops automatically. Pressing either shot button again during the extraction stops it immediately.
The preset is not a promise that every puck will produce the same beverage weight or taste. Coffee absorption, grind resistance and crema all affect what reaches the cup.
Use manual pre-infusion while dialing in
- Press and hold either 1 CUP or 2 CUP for the desired pre-infusion period.
- Release the button to move into full extraction.
- Press the flashing button again when the scale reaches the target yield.
Keep the manual pre-infusion choice consistent between comparison shots. If you change both pre-infusion time and grind size, the result will not show which adjustment caused the difference.
Program a custom 1 CUP or 2 CUP volume
- Prepare and lock in the portafilter, then place the cup and scale underneath.
- Hold 1 CUP and 2 CUP together for 2 seconds. Both buttons illuminate and flash.
- Press the button you want to program to begin extraction.
- Press the same button again at the desired stop point. The modified volume is saved.
Program each button separately. Recheck the output over several shots because volumetric control is convenient rather than laboratory-precise, and puck resistance varies.
Breville also provides an official Bambino Plus shot-volume demonstration. Button combinations in this guide are for the Plus model BES500; do not substitute a sequence copied from the original Bambino BES450.
How to reset the Bambino Plus shot volumes
Use the factory reset only when a 1 CUP or 2 CUP volume was changed accidentally or you want to clear both saved volumes. It does not reset grind, repair a blockage, cancel maintenance or fix a dead control panel.
- Turn the machine off by holding 1 CUP and STEAM together for 5 seconds.
- With the machine off, hold 1 CUP and 2 CUP together for 5 seconds. The buttons illuminate.
- Press either 1 CUP or 2 CUP. The light flashes three times to confirm that all espresso volumes were reset.
- The machine returns to ready mode.
Pressing another button exits the reset mode without completing the reset. If the panel displays an unusual pattern instead of the documented response, identify the alert through the BES500 troubleshooting hub rather than trying random combinations.
Milk temperature and foam settings
Automatic milk texturing has three temperature choices—Warm, Ideal and Hot—and three foam choices—Low, Medium and High. The machine remembers the last selected milk settings when it is turned on again.
| Drink style | Temperature start | Foam start |
|---|---|---|
| Flat white | Ideal | Low |
| Latte | Ideal | Medium |
| Cappuccino | Ideal | High |
| Milk alternative | Warm or Ideal | Test Low or Medium first |
These are practical starting points, not fixed recipes. Different dairy and plant-based products heat and aerate differently. Keep the supplied jug within its MIN and MAX markings, place it squarely on the drip-tray sensor, ensure the wand is fully lowered and adjust one setting after tasting the result.
If automatic texturing fails to start, stops early, produces no steam or displays the temperature-and-foam warning pattern, use the separate Bambino Plus steam-wand troubleshooting guide. Those are operating faults, not normal milk-setting choices.
Fix common Bambino Plus setting problems
Espresso runs too fast or tastes watery
Confirm that you are using the intended basket, then keep the dose fixed and grind finer. With a single-wall basket, stale coffee can run quickly even at a setting that previously worked. Use beans with a clear roast date, and do not try to correct old coffee only by overfilling the basket.
Espresso drips slowly or stops
Test the empty group head and a clean empty basket. If both flow normally, grind slightly coarser and confirm that the dose is not above the basket range. Clean blocked basket holes with the pin on the supplied cleaning tool rather than enlarging them with another object.
The same settings give different results
Weigh both the input and output. Check for retained grounds in the grinder, an uneven tamp, changing bean age, a wet basket or a different stop point. Allowing the grinder to dose only by time can also change the actual coffee weight as beans and hopper level change.
The saved button delivers too much or too little
First run the shot manually to prove that the coffee recipe itself is reasonable. Then reprogram the selected button at the desired scale weight. If both buttons were changed accidentally, use the documented factory volume reset and program again only after the puck preparation is consistent.
The shot has little crema
Check bean freshness, roast style, basket type and flow before blaming the machine. Freshly ground coffee in the single-wall basket should respond clearly to grind adjustments. Pre-ground coffee belongs in the dual-wall basket, but the foam it creates should not be treated as proof of freshness.
The shot changed after weeks of good results
Coffee changes as it ages, so a small grind correction is normal. If flow and temperature have weakened beyond the portafilter as well, check whether maintenance is due. Use the dedicated BES500 cleaning-cycle instructions for the tablet cycle or the separate Bambino Plus descaling procedure for mineral scale; the two cycles are not substitutes.
Settings the BES500 does not provide
- No built-in grind setting: use the controls on the external grinder.
- No user brew-temperature menu: the PID manages extraction temperature internally; the three temperature lights apply to automatic milk.
- No pressure-gauge target: evaluate the puck through flow, yield and taste instead of trying to copy a gauge position from another Breville model.
- No universal reset: the documented factory reset restores espresso volumes only.
This is why instructions for a Barista Express or the original Bambino can be misleading even when the machines share a 54mm format. Use the buttons and basket ranges documented for the BES500/BES500BSS.
A simple dial-in workflow to keep
- Choose single-wall for fresh beans or dual-wall for pre-ground coffee.
- Start with the 2 CUP basket and 18 g unless the coffee requires a small dose change.
- Warm the cup and portafilter path, then keep the basket dry for dosing.
- Distribute and tamp level in the same way each time.
- Use manual mode and a scale while testing.
- Adjust grind first: finer for fast flow, coarser for slow flow.
- Change yield according to taste after the flow is sensible.
- Program the button only when the recipe repeats reliably.
For model-specific specifications and safety instructions, consult the current U.S. BES500 instruction manual and Breville’s Bambino Plus product page.
Bambino Plus settings FAQ
What is the best grind setting for the Bambino Plus?
There is no model-wide grind number because the Bambino Plus uses an external grinder. Start in that grinder’s espresso range, hold dose constant and adjust until first flow occurs at roughly 8–12 seconds with a balanced taste.
How many grams should I use?
The U.S. manual specifies 8–11 g for the 1 CUP basket and 16–19 g for the 2 CUP basket. Start at 18 g in the 2 CUP basket and make only small changes if the coffee or puck height requires them.
Should I use the 1 CUP or 2 CUP basket?
The 2 CUP basket is usually easier for dialing in and works well for one double espresso. Use the 1 CUP basket when you specifically want its smaller dose, but expect to establish a separate grind and dose recipe.
Can I change the Bambino Plus brew temperature?
No user brew-temperature adjustment is documented for the BES500. The Warm, Ideal and Hot choices control automatic milk temperature, not espresso-water temperature.
Why does my shot stop at the wrong amount?
The button may have been reprogrammed, or changing puck resistance may have changed the weight that reaches the cup before the volumetric stop. Test manually, then reprogram the button or restore both factory espresso volumes.
Key settings to remember
Start with the 2 CUP single-wall basket, 18 g of fresh coffee and a fine espresso grind. Keep the dose and tamp consistent, look for first flow around 8–12 seconds and use a scale to choose the final yield. Adjust only one variable at a time, then save a custom shot volume after the recipe is stable.