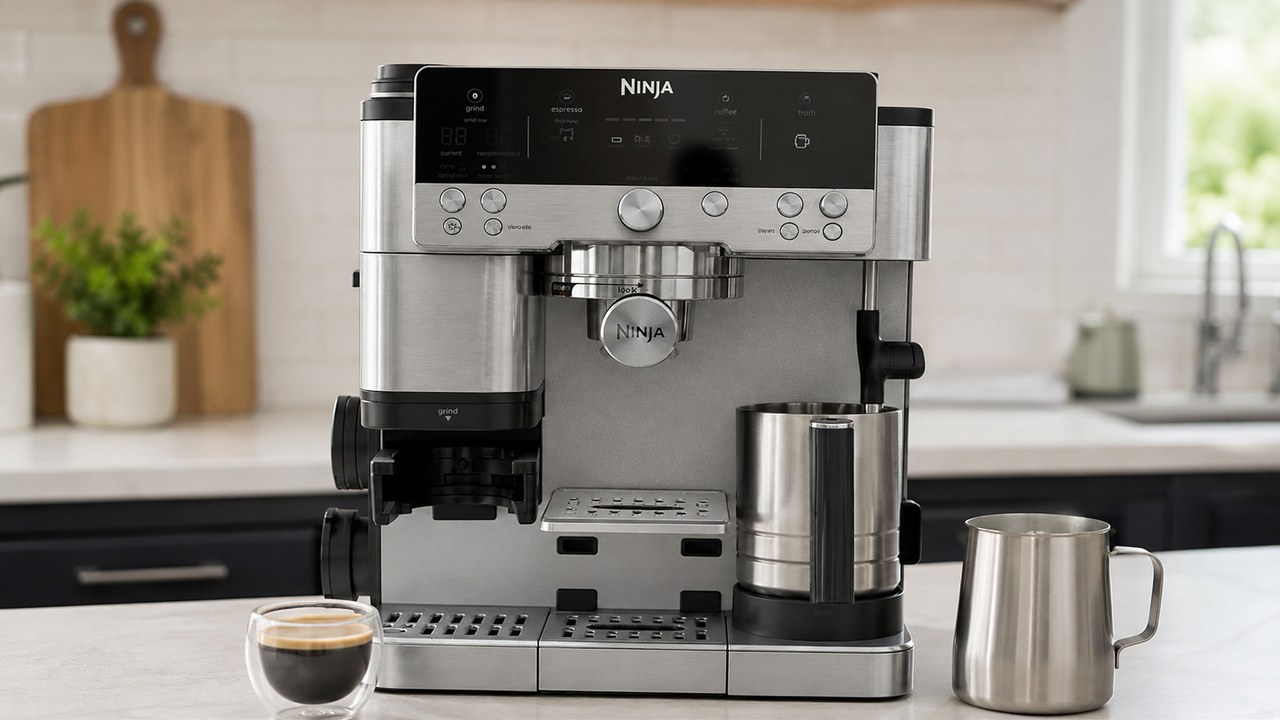
Setting up the Ninja Luxe Café Premier ES601 correctly takes a few more steps than filling the water tank and pressing Espresso. Before your first real drink, Ninja has you test your water hardness, fill the reservoir and bean hopper, run a one-time water flush, and then brew espresso twice so Barista Assist can begin dialing in the grinder for your beans.
This Ninja Luxe Café setup guide follows the first-use sequence for the U.S. ES601 and explains the parts that are easy to misunderstand, including where the portafilter goes for grinding versus brewing, why the first flush contains no coffee, what to do with the first calibration espresso, and what to check if the machine does not recognize a component.
Ninja Luxe Café ES601 setup at a glance
| Step | What to do |
|---|---|
| 1 | Unpack, wash and completely dry the removable parts |
| 2 | Test the water you plan to use with the hardness strip |
| 3 | Set water hardness from hd 0 to hd 5 |
| 4 | Fill and reinstall the water reservoir |
| 5 | Lock the hopper and add whole coffee beans |
| 6 | Run the one-time 12 oz CLASSIC water flush |
| 7 | Set up the double basket and portafilter for espresso |
| 8 | Follow the recommended grind setting and grind the first dose |
| 9 | Tamp with the assisted tamper and funnel |
| 10 | Brew the first calibration espresso and discard it |
| 11 | Repeat the espresso process once more |
| 12 | Begin making drinks normally |
1. Unpack the ES601 and identify the main parts
Before turning the machine on, take a moment to identify the parts you will use during setup. Several components move between different locations on the machine, and knowing which is which avoids many first-use problems.
- Portafilter: holds the basket during grinding and brewing.
- Double basket: the normal starting basket for espresso and the basket used during the initial water flush.
- Funnel: fits on the portafilter during grinding to help contain the grounds.
- Grinding cradle: where the portafilter sits while the ES601 weighs and grinds coffee.
- Group head: where the portafilter locks when you are ready to brew.
- Assisted tamper: compresses the freshly ground coffee before brewing while the funnel remains attached.
- Bean hopper: holds whole coffee beans for the integrated grinder.
- Water reservoir: supplies water for brewing, rinsing and steaming.
- Milk jug: works with the hands-free frothing system.
The most important distinction for a new owner is that the portafilter uses two different positions: the grinding cradle when grinding coffee and the group head when brewing it.
2. Wash and dry the removable parts before first use
Before proceeding with the first-use setup, clean the removable food-contact parts that require washing and make sure they are thoroughly dry before putting them back on the machine.
Drying matters particularly around coffee beans and the grinder. Water should not be introduced into the bean hopper or burr grinder.
You do not need to run the automated CLEAN or DESCALE cycles on a brand-new ES601. Those are periodic maintenance procedures, not first-use setup steps.
3. Test your water hardness before making coffee
The ES601 asks for your water hardness during initial setup because mineral content affects how quickly scale can build up inside the machine.
- Take the hardness test strip supplied with the machine.
- Use the same water you expect to put in the ES601 regularly.
- Completely submerge the test squares for approximately 5–10 seconds.
- Remove the strip and place it on a flat surface.
- Wait approximately 1 minute.
- Count how many squares have turned purple.
The result corresponds directly to the hardness setting: zero purple squares means level 0, one purple square means level 1, and so on up to five purple squares for level 5.
4. Set hd 0–hd 5 correctly
When the ES601 is first powered on, the control panel prompts you to set water hardness. The initial display may show hd 5, but that does not mean level 5 is automatically correct for your home.
- Turn the center dial until the displayed hd level matches the number of purple squares on your test strip.
- Press the center dial to confirm the setting.
Do not deliberately select the highest setting just to be safe. Use the measured value from the water you will actually put into the machine.
If you need to change hardness later, the option is available as _h08 in the Additional Settings menu. Our Ninja Luxe Café settings guide explains that menu and the other ES601 temperature, strength and reset options.
5. Fill and seat the water reservoir
Remove the reservoir from the back of the machine and fill it with room-temperature or cold water up to the Max Fill line. Do not fill above the line.
Reinstall the reservoir firmly against the machine. A reservoir that contains plenty of water but is not seated correctly can later produce symptoms that look like a pump or flow problem.
Use fresh drinking water rather than hot water from a kettle. The machine is designed to heat the incoming water itself.
6. Install and fill the bean hopper
Make sure the bean hopper is seated correctly and locked before filling it. Then add whole coffee beans.
Do not put pre-ground coffee into the bean hopper. The hopper feeds the integrated conical burr grinder and is intended for whole beans.
For the easiest first setup, use a conventional medium-roast whole bean rather than an extremely dark, oily coffee. You can change beans later once you are familiar with how the grinder and Barista Assist behave.
You do not have to fill the hopper completely. Add enough beans to complete the initial calibration drinks without the grinder running empty.
7. Run the required water flush before your first drink
The ES601 requires a one-time water flush before first use. This conditions the machine for brewing and is different from both the CLEAN and DESCALE maintenance cycles.
- Make sure the double basket is installed in the portafilter.
- Do not put coffee in the basket.
- Insert the portafilter into the group head at an angle to the left.
- Align the orange dot on the portafilter with the orange dot on the group head.
- Rotate the portafilter until its orange dot aligns with the lock arrow.
- Turn the center dial to CLASSIC.
- Press SIZE until 12 OZ is selected.
- Place a cup holding at least 14 oz underneath the portafilter.
- Press START BREW.
- Let the complete water-only brew finish.
- Discard the water and rinse and dry the portafilter.
You only need this special first-use flush once. Do not repeat a 12 oz empty CLASSIC brew before every normal espresso session.
Why the first flush matters
The initial flush is not an espresso extraction. There is no coffee in the basket and nothing needs to be dialed in yet.
Selecting CLASSIC at 12 oz gives the machine the programmed water flush required for first use. Once that is complete, you move to the separate espresso-calibration process.
8. Prepare the portafilter for your first espresso
After the water flush, confirm that the double basket is still installed in the portafilter. This is the normal starting basket for your first espresso calibration.
Install the funnel on the portafilter as required for grinding, then place the assembly into the grinding cradle rather than the group head.
Make sure the portafilter sits level and is pushed fully into position. Once installed, let go of it. The ES601 uses its built-in scale during the guided grinding process, so holding or pressing on the portafilter can interfere with accurate weighing.
9. Make sure the ES601 recognizes the portafilter
When the portafilter is correctly installed in the grinding cradle, the machine should recognize it and display the drink options available for the fitted basket.
If nothing happens:
- Remove the portafilter from the grinding cradle.
- Turn the ES601 off.
- Turn it back on.
- Reinstall the portafilter level and fully into the cradle.
Do not immediately assume that the grinder has failed simply because START GRIND is unavailable. Component detection must be correct before the guided grinding process can begin.
10. Select Espresso before grinding
Once the portafilter is recognized, turn the center dial to select ESPRESSO.
Do this before grinding because the ES601 uses the selected drink and basket to determine how it should dose the coffee.
This is one reason the Ninja Luxe Café setup differs from a basic espresso machine with an independent grinder: the machine is coordinating drink selection, basket recognition, grind recommendation and weight-based dosing.
11. Match the current grind setting to the recommended setting
The display shows a recommended grind size from Barista Assist and the grinder’s current setting.
If the two numbers do not match, rotate the grind-size dial on the left side of the machine until the current setting matches the recommendation.
Do not worry if your recommended number differs from a photo, video or another owner’s machine. The recommendation can vary with the coffee and with what Barista Assist has learned from previous extractions.
12. Grind your first espresso dose
With the portafilter correctly seated and Espresso selected, press START GRIND.
Leave the portafilter alone while the grinder is operating. The integrated scale is measuring the dose, so there is no benefit in supporting, lifting or pressing down on the portafilter while coffee is being dispensed.
Wait until grinding is fully complete before removing or tamping anything.
13. Tamp with the assisted tamper
After grinding finishes, remove the portafilter from the grinding cradle but leave the funnel attached.
- Place the portafilter on a solid, level surface.
- Keep the funnel installed on the portafilter.
- Place the supplied assisted tamper inside the funnel.
- Press the tamper straight down until it meets the funnel.
- Remove the tamper and funnel before installing the portafilter in the group head.
The ES601 uses a separate assisted tamper. The integrated lever tamper is a feature of the Ninja Luxe Café Pro ES701, not the Premier ES601.
14. Move the portafilter from the grinding cradle to the group head
This is the point where the portafilter changes locations.
- Grinding cradle: weighing and grinding.
- Solid, level surface: assisted tamping with the funnel attached.
- Group head: actual espresso brewing.
Remove the portafilter from the grinding cradle and insert it into the group head by aligning the orange marks. Rotate it until the portafilter mark reaches the lock position.
Place an espresso cup beneath the portafilter.
15. Brew the first espresso
Press START BREW. The progress indicator will show the brew status and the machine will signal when the cycle has finished.
The portafilter will be hot after brewing, so handle it appropriately when removing it from the group head.
This first espresso is part of Barista Assist calibration. Ninja instructs you to discard the first drink and repeat the espresso process once more.
16. Brew a second espresso so Barista Assist can dial in the beans
Prepare another espresso using the same basic process:
- Empty the used coffee puck.
- Return the clean portafilter and double basket to the grinding cradle.
- Select Espresso.
- Check the new recommended grind setting.
- Adjust the grind dial if the recommendation changed.
- Press START GRIND.
- Tamp with the assisted tamper and funnel.
- Lock the portafilter into the group head.
- Press START BREW.
After the second extraction, Barista Assist has had the initial brews it needs to establish a more appropriate grind recommendation for those beans.
Why the recommended grind may change after the first espresso
A different recommendation after the first extraction is not evidence that the grinder is inconsistent. It is part of what Barista Assist is designed to do.
The machine uses previous extraction behavior to refine the recommendation. Follow the newly displayed grind size before the next dose rather than forcing the grinder back to the number it showed originally.
You should expect to go through this dialing-in process again when you switch to a substantially different coffee bean.
Do you need to repeat setup every time you change beans?
No. You do not repeat the first-use water flush or initial machine setup every time the hopper changes.
What does need to adapt is the coffee calibration. Different beans can require a different grind size, so let Barista Assist update its recommendation and judge the new extractions before assuming the old grind number should remain correct.
Good beans for the first Ninja Luxe Café setup
You can use the coffee you normally enjoy, but a conventional medium roast is a forgiving choice while learning the machine.
- Use whole coffee beans in the hopper.
- Avoid beans with an extremely heavy oily coating for your first grinder experience.
- Use enough beans that the hopper does not empty during calibration.
- Do not worry about copying another owner’s exact grind number.
Once you understand how Barista Assist and the grinder respond, you can experiment with different roast levels and adjust temperature or strength according to taste.
Settings you do not need to change during initial setup
The ES601 includes an Additional Settings menu, but there is no reason to change every option before making your first coffee.
For a straightforward first setup, keep most preferences at their defaults and concentrate on:
- Correct water hardness.
- Correct basket and portafilter installation.
- Recommended grind size.
- Normal strength.
- Medium brew temperature.
After you know what the default drink tastes like, you can make purposeful changes instead of adjusting several variables before you have a baseline.
What if the ES601 says INSTALL HOPPER during setup?
Remove the hopper and make sure no beans or debris are preventing it from sitting flat. Reinstall it and rotate it fully into the locked position.
Do not force the hopper if it will not turn normally. Check its alignment first.
What if it says INSTALL PORTAFILTER?
First check where the machine expects the portafilter to be. During grinding it belongs in the grinding cradle; during brewing it belongs in the group head.
If the machine is waiting to grind, remove the portafilter and reinstall it level and fully into the cradle. Coffee grounds around the cradle can also interfere with correct positioning.
What if it says INSTALL FUNNEL?
The funnel belongs on the portafilter during the guided grinding process. Remove it, clear away loose coffee, reinstall it correctly and place the portafilter assembly back into the grinding cradle.
A persistent installation message after the components are correctly fitted moves beyond ordinary first-use setup. Our Ninja Luxe Café troubleshooting guide covers the ES601 display messages and broader faults.
What if START GRIND does not appear?
Do not start by taking the grinder apart. START GRIND depends on the machine recognizing the required grinding setup.
- Confirm the hopper is locked.
- Make sure whole beans are available.
- Install the correct basket.
- Fit the funnel correctly.
- Push the portafilter fully and level into the grinding cradle.
- Select the intended drink.
If all of those conditions are correct but the grinder still cannot be used, troubleshoot the grinder or component-detection problem separately rather than repeating the initial setup.
What if no water comes out during the first flush?
Stop and check the water supply before moving on to coffee.
- Make sure the reservoir contains enough water.
- Remove and firmly reinstall the reservoir.
- Confirm CLASSIC and 12 OZ are selected.
- Make sure the portafilter with empty double basket is correctly locked in the group head.
A brand-new machine that cannot perform its required water flush should not simply be pushed onward to espresso grinding and brewing. Resolve the water-flow problem first.
Your first latte after setup
Once espresso calibration is complete, a latte is a simple way to learn the hands-free DualFroth system.
- Brew your espresso using the now-calibrated process.
- Add milk to the LATTE line in the milk jug.
- Place the jug on its platform with the steam wand inside.
- Select DAIRY or PLANT-BASED to match the milk.
- Select the desired froth style.
- Start the frothing cycle.
- When frothing finishes, wipe the hot steam wand immediately with a damp cloth.
- Return the wand to its down position so the machine can perform its purge.
If the milk system refuses to start, produces no steam or repeatedly stops, use our Ninja Luxe Café frother troubleshooting guide rather than repeatedly changing setup settings.
First-use mistakes to avoid
- Skipping the one-time water flush.
- Putting ground coffee into the bean hopper.
- Using hot water to fill the reservoir.
- Leaving the water reservoir loosely seated.
- Holding the portafilter while the built-in scale is weighing it.
- Putting the portafilter in the group head when the machine expects it in the grinding cradle.
- Ignoring the recommended grind setting on the first calibration brews.
- Changing grind, temperature and strength all at once before tasting the default result.
- Assuming a new grind recommendation after the first espresso means something is wrong.
- Running CLEAN or DESCALE as part of normal brand-new-machine setup.
What should you clean after the first drinks?
Normal first-use cleanup is simple. Remove the used coffee puck, rinse the portafilter and basket, and clean milk-contact parts promptly after frothing.
Wipe the steam wand while residue is still fresh and let the machine perform its normal purge. Do not wait for dried milk or coffee oils to build up before cleaning the parts you use every day.
For the ongoing schedule, including the 6-minute CLEAN cycle and periodic grinder maintenance, see our Ninja Luxe Café cleaning guide.
Do you have to use the exact recommended grind setting?
Use it as the starting point during setup. Barista Assist is designed to guide you toward an appropriate grind, then refine that recommendation after seeing how the coffee extracts.
Once the machine has calibrated and you understand the result, you can make small deliberate adjustments according to taste. The recommended number is guidance, not a universal grind setting that every bean must use forever.
Do you need to factory reset a new Ninja Luxe Café?
No. A normal new ES601 should be configured through the first-use prompts and calibration procedure. Factory reset is not a standard setup step.
Only use the factory-reset option when you intentionally need to restore adjustable settings after the machine has already been configured. Resetting a brand-new machine without a reason simply adds another variable to the setup process.
When is the Ninja Luxe Café fully set up?
Your ES601 is ready for normal use once you have set the correct water hardness, filled and seated the reservoir, installed and filled the hopper, completed the one-time 12 oz CLASSIC water flush, and taken Barista Assist through its initial espresso calibration.
From that point onward, you do not need to repeat the whole setup each morning. Fill water and beans as needed, let Barista Assist guide the grind for the coffee you are using, and adjust temperature or strength only when you have a specific reason to change the result.
If something fails during setup, use the stage where it fails to narrow the cause: no water during the flush points toward water supply or flow, no START GRIND points toward grinding setup or component detection, and a portafilter that is not recognized should be reseated in the correct location before you assume there is a hardware fault.