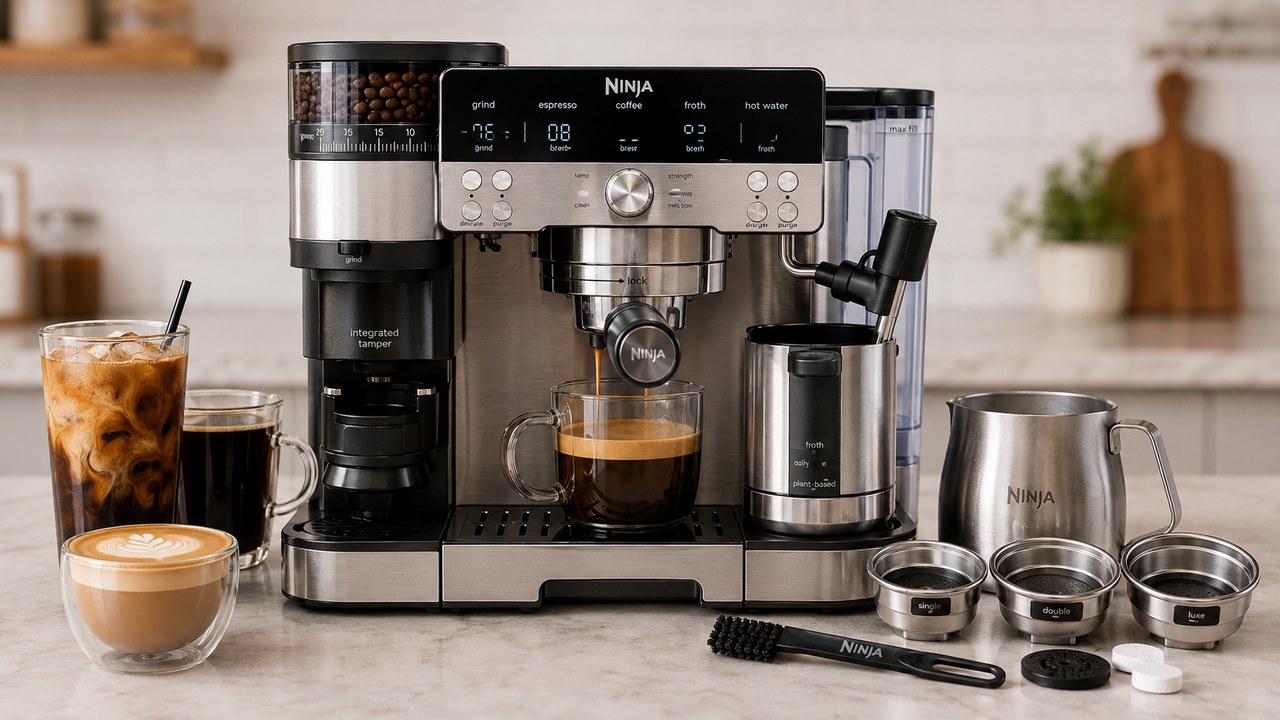
If you are looking for the Ninja Luxe Café Pro manual for the U.S. ES701, the official booklet is titled ES700 Series Owner’s Guide. The U.S. document is a 16-page guide identified as ES701_IB_MP_Mv38, and it covers first setup, controls, brewing, frothing, cleaning, additional settings and troubleshooting.
This page is a practical companion to that manual rather than a copy of it. Use it when you need to quickly find what a control does, which basket to use, how the grinder and integrated tamper work, how to change temperature or strength, what the h01–h07 settings mean, or what to check when the ES701 displays a notification.
If you specifically want to use the machine’s lower-temperature coffee mode, our Ninja Luxe Café Pro cold brew guide explains the Luxe basket, grind recommendation, ice, brew time, Cold Foam and the difference between Cold Brew and Over Ice.
Ninja Luxe Café Pro ES701 manual at a glance
| U.S. model | ES701 |
| Manual family | ES700 Series Owner’s Guide |
| Document ID | ES701_IB_MP_Mv38 |
| Voltage | 120V, 60Hz |
| Power | 1650W |
| Water reservoir | 70 oz |
| Grinder | Integrated conical burr grinder with 25 settings |
| Dosing | Built-in scale with weight-based dosing |
| Tamper | Integrated lever tamper |
| Frothing | Dual Froth System Pro with 5 presets |
| Hot water | Independent hot-water outlet |
Where to find the official ES701 information
The U.S. ES701 is part of Ninja’s ES700 Series for documentation purposes. That is why a manual may say ES700 Series on the cover even though your machine itself is labeled ES701.
You can also use the official Ninja ES701 product and support page for current U.S. specifications, accessories and support information.
Be careful with manuals labeled ES701UK or ES701EU. Those are regional versions and can differ in voltage, accessories, drink options and documentation. This guide focuses on the U.S. 120V ES701.
ES701 controls explained
| Control | What it does |
|---|---|
| POWER | Turns the ES701 on or off |
| START GRIND | Starts weight-based grinding |
| Center Dial / START BREW | Selects drinks, options and starts brewing |
| SIZE | Changes drink size and opens Additional Settings when held |
| TEMP/STRENGTH | Adjusts brewing temperature or drink strength |
| MILK TYPE | Selects dairy or plant-based milk |
| Froth Dial / START FROTH | Selects and starts frothing |
| PURGE | Flushes the steam wand |
| HOT WATER | Activates the independent hot-water system |
| CLEAN | Starts the cleaning-cycle procedure |
| DESCALE | Starts the descaling procedure |
What comes with the Ninja Luxe Café Pro ES701?
The current U.S. ES701 package includes the main brewing accessories needed to start using the machine:
- Portafilter.
- Single basket.
- Double basket.
- Luxe basket.
- XL milk jug.
- Cleaning brush.
- Cleaning disc.
- Cleaning tablets.
- Descaling powder.
- Water-hardness test strip.
The integrated grinder, scale and tamper are built into the ES701 itself rather than supplied as separate accessories.
ES701 vs. ES601: important manual differences
Do not automatically use every ES601 instruction on an ES701. The two Luxe Café machines share the same basic concept, but the Pro adds hardware and controls that change how some procedures work.
| Feature | ES601 Premier | ES701 Pro |
|---|---|---|
| Tamper | Assisted tamping system | Integrated lever tamper |
| Espresso baskets | Double and Luxe | Single, Double and Luxe |
| Froth presets | 4 | 5 |
| Extra Thick Froth | No | Yes |
| Independent hot water | Model-dependent Luxe Café function | Dedicated hot-water system |
| Additional-settings numbering | Different menu layout | h01–h07 on U.S. ES701 guide |
One especially important difference is temperature control. On the U.S. ES701, brew temperature is adjusted with the TEMP/STRENGTH button. In the Additional Settings menu, _h06 controls froth temperature and _h07 controls water hardness.
If you are deciding between the two machines rather than looking for ES701 instructions, see our Ninja Luxe Café Pro vs Premier comparison for the full ES701 vs ES601 differences, including tamping, frothing, hot water, espresso options, price, and which model offers better value.
First setup before brewing
Before your first drink, remove all packaging and tape, hand-wash the removable accessories and dry them thoroughly.
Do not allow water into the grinder. The hopper and grinder should remain dry.
Test your water hardness
- Submerge the supplied hardness strip in the water you plan to use for 5–10 seconds.
- Remove it and lightly shake off excess water.
- Place the strip on a dry, flat surface for 1 minute.
- Count the purple squares from 0 to 5.
- When the ES701 displays the hardness setup, select the matching hd 0–hd 5 value.
This setting matters because the machine uses water hardness to help determine when descaling should be recommended.
Fill the reservoir
Fill the reservoir with room-temperature or cold drinking water up to the Max Fill line and reinstall it firmly against the back of the machine.
If there is not enough water for the selected drink, the ES701 can display ADD WATER. You can refill the reservoir and resume the brew when prompted.
Fill the bean hopper
With the machine unplugged, add whole coffee beans to the hopper and make sure its handle is in the locked position.
Do not put pre-ground coffee or water into the bean hopper.
Run the first water flush
The ES701 first-use procedure includes a water-only flush before you begin dialing in espresso. This primes and rinses the brew path rather than making a drink.
Follow the first-brew prompts on the control panel and use the empty basket and vessel specified by the machine. Once the first-use flush is complete, dry the basket before adding ground coffee.
Which basket should you use?
The Pro gives you three basket options instead of forcing every espresso into the same dose range.
| Basket | Best used for |
|---|---|
| Single | Smaller espresso drinks and single-shot preparations |
| Double | Standard double espresso drinks |
| Luxe | Larger coffee doses and Luxe-style drinks |
The machine detects the brewing setup and uses Barista Assist and weight-based dosing to determine an appropriate dose for the selected drink.
How the ES701 grinder works
The integrated conical burr grinder has 25 grind settings. Barista Assist displays a recommended grind size for the drink and coffee you are using.
- Install the appropriate basket in the portafilter.
- Place the portafilter correctly in the grinding cradle.
- Select the desired drink.
- Compare the current grinder setting with the recommended number.
- Adjust the grind dial if required.
- Press START GRIND.
The built-in scale controls the dose by weight, so avoid holding or pressing on the portafilter while the grinder is weighing and dispensing coffee.
How to use the integrated tamper
After grinding, leave the portafilter in the grinding cradle and use the tamper lever.
- Push the tamper lever down firmly.
- Continue beyond the initial resistance until the lever stops.
- Release it.
- Tamp a second time for a more even puck.
Uneven or excessively light tamping can contribute to fast espresso flow and poor crema.
How to brew espresso on the ES701
- Select the basket that matches the drink you want.
- Use the recommended grind setting and press START GRIND.
- Tamp twice with the integrated lever.
- Move the portafilter from the grinding cradle to the group head.
- Align the orange marks and rotate the portafilter to the locked position.
- Place an appropriately sized cup underneath.
- Select the desired espresso style and size.
- Press START BREW.
Do not remove the portafilter while the machine is actively brewing and under pressure.
Espresso strength settings explained
On the ES701, espresso strength changes the ratio of water to ground coffee rather than simply telling the grinder to use more beans.
| Strength | Approximate ratio | Result |
|---|---|---|
| 1 | 4:1 water to grounds | Taller, less concentrated espresso |
| 2 | 2.5:1 | Default balance |
| 3 | 2:1 | Shorter, more concentrated espresso |
This explains why increasing espresso strength can make the output smaller. A smaller drink after changing strength is not necessarily a pump problem.
Coffee strength works differently
For drip-style coffee, the strength control changes coffee dosing:
- Mild: fewer beans are ground.
- Default: normal dose.
- Bold: more beans are ground.
Do not expect espresso Strength 3 and coffee Bold to work through the same mechanism.
How to change brew temperature
Unlike the U.S. ES601 Additional Settings menu, the ES701 lets you change brew temperature directly with the TEMP/STRENGTH control.
If TEMP is not currently selected, press and hold TEMP/STRENGTH for about 3 seconds, then choose:
- Low
- Medium — default
- High
Medium is the sensible starting point. Darker roasts generally suit Low or Medium, while lighter roasts can benefit from Medium or High.
Coffee not hot enough?
Before assuming the ES701 is failing to heat properly, separate brew temperature from heat loss after brewing.
- Preheat the portafilter with hot water.
- Preheat the cup.
- Use a cup reasonably close to the drink size.
- Try the High brew-temperature setting when appropriate for the beans.
- Check whether descaling is overdue if temperature has gradually declined.
How to use the Dual Froth System Pro
The ES701 combines steam and whisking and provides five preset froth styles:
- Steamed Milk.
- Thin Froth.
- Thick Froth.
- Extra Thick Froth.
- Cold Foam.
If the frothing cycle will not start, steam is weak, milk stays too cool, or the foam texture is wrong, see our Ninja Luxe Café Pro frother troubleshooting guide for ES701-specific checks.
- Add the desired amount of milk to the XL jug.
- Place the jug correctly on its platform.
- Position the steam wand in the jug.
- Select DAIRY or PLANT-BASED with the MILK TYPE button.
- Select the desired froth preset.
- Start frothing.
Cold Foam is intentionally not heated, so cold milk on that setting is normal behavior.
How to change froth temperature
Froth temperature is separate from brew temperature. On the U.S. ES701 it is found in _h06 in the Additional Settings menu.
- Press and hold SIZE for about 3 seconds.
- Turn the center dial to _h06.
- Select it with START BREW.
- Choose LO, M or HI.
- Confirm the selection.
Medium is the default.
How to use the independent hot-water dispenser
The ES701 has a dedicated hot-water outlet behind the group head. This lets you dispense hot water without running it through the coffee basket.
- Place a cup centrally beneath the hot-water outlet.
- Press HOT WATER.
- Turn the center dial to choose Low, Medium or High water temperature.
- Press START BREW.
- Press START BREW again when you have enough water, or let the automatic program finish.
If you do not stop it manually, the programmed hot-water cycle dispenses approximately 8 oz.
How to switch coffee beans
Do not simply pour a new coffee on top of a nearly empty hopper if you want Barista Assist to calibrate cleanly for a different roast.
- Unlock and remove the bean hopper.
- Pour out the remaining beans.
- Reinstall and lock the empty hopper.
- Place the portafilter in the grinding cradle.
- Press and hold START GRIND to clear remaining beans from the grinder.
- Add the new beans.
- Reset Barista Assist if you are changing bean or roast type substantially.
Avoid flavored beans in the integrated grinder when possible because added oils and sugars can increase residue buildup.
ES701 h01–h07 additional settings
Hold the SIZE button for approximately 3 seconds to open the Additional Settings menu.
| Code | Setting | What it does |
|---|---|---|
| _h01 | Beeps | Turns audible beeps on or off |
| _h02 | Eco Mode | Turns the boiler off after brewing to save power |
| _h03 | Recommended Grind Size | Shows or hides grind recommendations |
| _h04 | Barista Assist Reset | Returns the recommended grind setting to its default |
| _h05 | Factory Reset | Resets machine variables to defaults |
| _h06 | Froth Temperature | Low, Medium or High |
| _h07 | Hard Water | Sets hd 0 through hd 5 |
This is one of the most important areas where copying ES601 instructions can lead you wrong: _h06 on the ES701 is froth temperature, not brew temperature.
Barista Assist reset vs. factory reset
Use _h04 when you only want Barista Assist to forget its learned/recommended grind starting point, such as after changing to substantially different beans.
Use _h05 only when you deliberately want to return the machine’s adjustable variables to their factory defaults.
There is no reason to factory-reset the entire ES701 simply because you changed coffee beans.
Intelligent notifications and what they mean
| Message | What to do |
|---|---|
| ADD BEANS | Add whole beans and check that they can feed into the grinder |
| INSTALL PORTAFILTER | Seat the portafilter correctly in the expected location |
| INSTALL HOPPER | Reinstall and lock the bean hopper |
| ADD WATER | Fill and firmly reseat the reservoir |
| INSTALL JUG | Place the milk jug correctly on its platform |
| RINSE | Complete the requested rinse procedure |
| PURGE | Flush the steam wand |
| CLEAN | Run the cleaning cycle |
| DESCALE | Run the descaling procedure |
What an Er code means
If the ES701 displays Er followed by a number, such as Er 03, Ninja treats that differently from normal notifications.
Write down the complete error number and contact Ninja Customer Service rather than repeatedly running cleaning cycles or opening the machine. The U.S. owner’s guide directs owners with an Er code to Ninja support.
No water coming from the portafilter
- Make sure the reservoir contains enough water for the selected basket and drink.
- Remove and firmly reseat the reservoir.
- Allow the machine to finish warming up.
- Check whether the grind is excessively fine.
- Descale if maintenance is overdue.
With the Luxe basket, the machine may require substantially more water than with the Single or Double basket, so a reservoir that appears to contain some water can still be insufficient for the selected brew.
Espresso flowing too slowly
A slow stream usually points first toward excessive resistance through the coffee puck.
- Follow the current Barista Assist grind recommendation.
- Check the basket holes for clogs.
- Clean accumulated grounds from the basket.
- Descale the machine if scale buildup is plausible.
Espresso flowing too fast
If espresso rushes through the basket, check the opposite conditions:
- The grind may be too coarse.
- The puck may have been tamped too lightly.
- The integrated tamper should be pressed firmly to its stop and used twice.
Espresso leaking around the portafilter
If espresso escapes around the outside edge of the portafilter instead of flowing through the basket:
- Make sure the portafilter is fully locked into the group head.
- Clean loose coffee from the basket and portafilter rim.
- Inspect the group-head sealing area.
If correct installation and a clean rim do not stop the leak, the group-head seal may require replacement or service.
Frothing will not start
- Allow the ES701 to reach operating temperature.
- Check that the reservoir contains enough water.
- Firmly reseat the reservoir.
- Make sure the steam wand is positioned in the milk jug.
- Make sure the jug is correctly seated on its platform.
- Fill milk at least to the minimum level.
No crema or weak crema
Before blaming the pump, check the coffee preparation itself.
- Tamp firmly and twice.
- Use the recommended grind setting.
- Check that the grind is not excessively coarse.
- Use reasonably fresh beans.
- Keep basket holes clean.
CLEAN and DESCALE are different
The ES701 uses separate maintenance notifications because coffee residue and mineral scale require different procedures.
- CLEAN: removes coffee oils and grounds from the brew system.
- DESCALE: removes mineral buildup from the internal water system.
Do not treat a cleaning tablet as descaler or assume descaling solution replaces the CLEAN cycle.
Routine maintenance from the manual
The ES701 manual separates immediate cleanup from deeper periodic maintenance. For the full procedure, including the 6-minute CLEAN cycle, grinder, integrated tamper, steam wand, baskets and drip tray, see our Ninja Luxe Café Pro cleaning guide. A practical routine is:
- Remove the used puck and rinse the portafilter after brewing.
- Wipe and purge the steam wand after milk drinks.
- Empty and clean the drip tray regularly.
- Keep the shower screen and group-head area free of coffee buildup.
- Brush the conical burr grinder periodically.
- Clean the integrated tamper if coffee accumulates around it.
- Run CLEAN and DESCALE when the machine requests them.
Does the ES701 use a water filter?
The U.S. ES701 supports the same optional Luxe Café reservoir filter system used by several machines in the family. The current standard ES701 package does not list the water filter housing among the included accessories.
If you want to add one, our Ninja Luxe Café water filter guide covers the correct filter inserts, reusable housing, ES701 compatibility, installation and replacement interval.
ES701 specifications quick reference
| Model | ES701 |
| Series | Ninja Luxe Café Pro / ES700 Series documentation |
| Voltage | 120V, 60Hz |
| Power | 1650W |
| Water reservoir | 70 oz |
| Grind settings | 25 |
| Froth presets | 5 |
| Included baskets | Single, Double and Luxe |
| Warranty | 1-year limited warranty on current U.S. product listing |
Where is the ES701 model and serial number?
Look for the QR-code rating label on the back of the machine near the power cord. The owner’s guide identifies this as the location of the model and serial information.
Keep the serial number and proof of purchase available if you contact Ninja about a warranty or hardware problem.
When to stop following manual troubleshooting
The owner’s guide is designed around normal user controls, cleaning and accessible maintenance. Stop troubleshooting when the next step would involve opening the body of the machine, bypassing a safety feature or working on internal electrical, heating or pressurized-water components.
- An Er code repeatedly appears.
- The machine has a burning smell or visible electrical damage.
- Water is leaking into the electrical/base area.
- The ES701 remains completely dead on a verified working outlet.
- A mechanical fault persists after the normal user-accessible cleaning steps.
For U.S. support, the ES700 Series Owner’s Guide lists Ninja Customer Service at 1-877-646-5288.
The useful way to use the Ninja Luxe Café Pro manual
You rarely need to read the ES701 manual from page 1 every time something comes up. Use the symptom or task to find the relevant system first: grinding and tamping for dose problems, TEMP/STRENGTH for brew adjustments, _h06 for froth temperature, _h07 for hardness, HOT WATER for the independent dispenser, and the CLEAN or DESCALE buttons only for their respective maintenance procedures.
The biggest mistake is assuming every Luxe Café model uses identical controls. The ES701 Pro has its own integrated tamper, Single basket, five froth presets, independent hot-water system and a different Additional Settings layout from the ES601 Premier.
Once those differences are clear, the ES701 manual becomes much easier to use: Barista Assist handles much of the grind and brew guidance, while the manual is most valuable for understanding what each control means, setting up the machine correctly, maintaining it and knowing when a symptom has moved beyond normal owner troubleshooting.